How to Build a Plex Media Server PC - Step-by-Step GuideA beginner's guide to building your own Media Server PC including selecting components, assembly, OS installation and configuration.
My trusty old NAS server has run out of capacity and the AMD Turion II Neo N40L isn't much up to the job of handling NAS, Plex Media Server, LAMP development and cloud storage all at the same time. I decided on a new server using budget components while still delivering a solid performance upgrade.
Media Server Hardware Choice
There is a huge range of components to choose from, but it's not the minefield people make it out to be.
First, you need to decide on the requirements for the system you are building. My system is primarily a network storage server and secondly a Plex Media Server.
The requirements for a NAS server are pretty simple, it just needs a lot of hard drives, fast ethernet and a bit of memory (RAM).
Plex Media Server requires a bit more in the specifications. Since the Media Server will quite often be transcoding video (converting one format to another, streamable format) it will require more RAM and a fast processor. The website for Plex Media Server specifies that for a single 4K transcode an Intel Core i7 3.2GHz is required. All of my videos are 1080p but I'm building this server in the hopes I get 4K at some point, but for now, just 1080p. I will only be watching one video at a time, so the single transcode is what I'm after.
I chose the AMD FX 4300 3.8Ghz Quad-Core processor because it is a lot cheaper than the Intel for roughly the same performance.
Once you have the processor chosen, the rest is simply finding the motherboard and RAM that are compatible with that processor. I chose the Gigabyte 78LMT-USB3 because it has the most SATA ports for the hard drives and since it's not going to be memory performance-intensive I went for budget RAM. If you are building a gaming machine or video editing workstation then you would want to go for higher quality RAM.
Processors need cooling and most processors come with a basic heatsink and fan, however, I'd highly recommend buying a third-party CPU cooler as the basic ones are often inefficient, noisy and ineffective. Because my system is going to be a living room media server it needs to be as quiet as possible, so I wanted water cooling. Heatsink and fans make a lot of noise and the hotter they get, the faster the fan spins and the more noise it makes. Watercooling is virtually silent. I went for the Corsair H45 Liquid Cooling as it is a direct plugin-and-go system. In the past, I have built my own custom water-cooling gaming PC but I did not want the hassle this time.
You will also need a power supply to power everything in the building. This will depend on the CPU and Graphics card power requirements and you should check the datasheets for the correct wattage. Since I am using the onboard graphics my power requirements are quite small, but it's a good idea to go for a higher wattage power supply than the specs recommend. For example, if the graphics card recommends a 600W PSU, go for an 800+. It's not good to run a PSU at 100% capacity.
Finally, you will need a case where everything will be housed in. This is primarily affected by three things - the motherboard form factor, the CPU cooler and your preference in design. Motherboards come in various form factors, that is the size and position of components. There are ATX, Micro ATX, LPX and Mini LPX and the older AT and Baby AT. ATX variants are the most common. Check the specifications for the motherboard and the case. The case also needs space to fit the CPU cooler you select. Some coolers can be quite tall and will need plenty of space to accommodate them.
You may also need a monitor, keyboard, mouse and speakers or headphones depending on what you already have and what you need the server for.
Here are the parts I selected for my build:

- AMD FX 4300 3.8Ghz Quad-Core
- Gigabyte 78LMT-USB3
- 8GB Corsair DDR3 (2x 4GB)
- Corsair H45 Liquid Cooling
- Corsair CS550M PSU
- Corsair Carbide AIR 240 Case
- Corsair CSSD-F120GB3-BK Force Series 3 120GB SSD
- 4x WD Red 6TB HDD (RAID10)
Component Assembly
Now comes the fun part. Once you know all the components you need to buy, the rest of the process is just putting together the puzzle pieces.
We are going to be working with sensitive electronic components so you must ground yourself first to remove any static build-up you may have in your body. Ideally, you should equip yourself with an anti-static strap.
Since my camera was being used to shoot the video (below) I have used photos from a previous computer build to illustrate this post.
The first thing to do is to find a suitable work area where you can spread out the parts and tools, have room to move around and is well-lit.
Next, unpack the case and locate all the mounting hardware. Open the case on both sides as this will be easier to fit the parts in. The case should have instructions for the installation of the motherboard and power supply. Follow the instructions that came with your case, but in general, it will go something like this.
Unpack the power supply and fit that into the case.
Next, locate the large motherboard mounting platform. This may already have standoffs installed or there may be a plastic bag with standoffs that you need to screw in. This is what will hold the motherboard on the case.
Next, lower the motherboard onto the standoffs and ensure that you line up the motherboard I/O panel with the backplate of the case before you lower the motherboard onto the standoffs. Use the supplied screws to firmly attach the motherboard to the case. Do not over-tighten the screws, tighten them just enough to hold the motherboard in place.
Most if not all parts these days will only fit into the slot they are designed to go into. That makes things a lot easier.
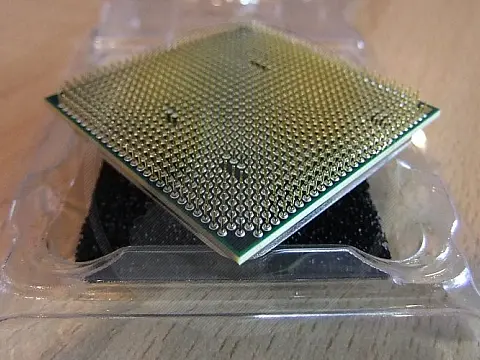
The CPU is very delicate and has hundreds of tiny fragile pins on the underside. Great care must be taken when handling it. Only handle the CPU by the edges of the heat spreader. Do not touch the pins.

The CPU will come with instructions for mounting it. Generally, you gently place the CPU chip onto a mounting bracket, then close a lever to finish the installation. You need to take note of which way around it goes. Typically the CPU will have a corner marker which you line up with the corner marker on the CPU bracket. Then you can install the heatsink and fan. These can be tricky to install so be sure to check the instructions that come with it.
Next, we can install the memory. These slot into the long slots, taking note of where the notch sits in the slot. The notch makes it so it only fits one way.
You can now take the motherboard connector on the power supply and connect it to the motherboard. This is usually the largest connector block, but check the motherboard and PSU instructions for clarification.
Now you can install the hard drives, connect them to the SATA ports and the power supply using the provided cables, and plug in any accessory cards such as graphics or sound. Most cables can only fit in one slot, and notches prevent installing the wrong way around, so it shouldn't be too difficult to figure out.
Here is a sped-up video of my completing my build.
Installing Linux
I have created a separate guide for installing Linux which has step-by-step instructions for downloading, installing and configuring.
Configure NAS
To turn the server into a NAS server we must install a few bits of software. The first will let us use the hard drives in a RAID array for data redundancy and protection. The second will allow us to serve files to other computers over the network.
RAID is a method of using multiple hard drives to act as one. For details of different raid types, performance and data redundancy, please see my tutorial Visual Guide to RAID Levels for details on the different RAID modes.
Installing RAID in Ubuntu, issue these commands:
sudo apt-get update
sudo apt-get install mdadm
Now, using fdisk delete any partitions on the disks that will become part of the array. This process will wipe data, so go carefully here.
Next, create the RAID array using the available hard drives
mdadm -v --create /dev/md0 --level=raid10 --raid-devices=4 /dev/sdb1 /dev/sdc1 /dev/sdd1 /dev/sde1 When that is complete, you can format the new array
mkfs.xfs /dev/md0
And the finally mount for use
mount /dev/md0 /myraid
Check Status of the RAID array
To check the status and health of the array, use this command:
cat /proc/mdstat
This will output something like this
Personalities : [linear] [multipath] [raid0] [raid1] [raid6] [raid5] [raid4] [raid10]
md0 : active raid10 sdd[2] sde[3] sdb[0] sdc[1]
3906765824 blocks super 1.2 512K chunks 2 near-copies [4/4] [UUUU] Additional commands of use
To stop an array
sudo mdadm --stop /dev/md0
To remove a disk from an array
sudo mdadm --remove /dev/md0 /dev/sda1
Add a disk to an array
sudo mdadm --add /dev/md0 /dev/sda1
Start an Array, to reassemble (start) an array that was previously created
mdadm --assemble --scan
Install Samba for Network Sharing
One of the most common ways to network Ubuntu and Windows computers is to configure Samba as a File Server. This section covers setting up a Samba server to share files with Windows clients.
sudo apt-get update
sudo apt-get install nfs-kernel-server
The main Samba configuration file is located in /etc/samba/smb.conf. Edit this file and add in your shares information. Mine is shown below as an example.
[fileserver]
guest only = yes
guest account = root
create mode = 777
public = yes
directory mode = 777
path = /myraid/files
writeable = yes
force user = root
force group = root
After making changes, use these commands to restart the services and apply changes.
sudo restart smbd
sudo restart nmbd
You should now have the RAID volume available to be accessed by any computer on the same network.
Install and Configure Plex Media Server
PLEX is a home media server which organises your video, music, and photo collections and streams them to all of your screens. Installation is a breeze but requires a few extra steps as it's not in the main universe.
First, visit the PLEX website and note down the link to the Linux .deb download.
In the command line, download the file to your home folder and run the installer. At the time of writing, the latest version is:
wget https://downloads.plex.tv/plex-media-server/0.9.15.3.1674-f46e7e6/plexmediaserver_0.9.15.3.1674-f46e7e6_amd64.deb
sudo dpkg -i plexmediaserver_0.9.15.3.1674-f46e7e6_amd64.deb
Once installed, you can access the web interface from the following URL
http://127.0.0.1:32400/web Change the IP address to match your server IP address or hostname. You can then configure your library collection from the settings menu.
Enjoy new Media Server!
You can now enjoy your new server. You should be able to browse the NAS share from any computer on the network, add movies to the shared drive and watch them on Plex.
I highly recommend using RasPlex as a go-between. RasPlex provides a gorgeous UI on your TV while the NAS and Plex server can sit in another room.


