How to DISABLE Automatic Reboots After Updates in Windows 10How to disable Windows 10 Updates from forcing an automatic reboot and prevent data loss due to random forced Windows Update reboots.
Windows 10 Updates force a reboot and there is nothing you can do to stop this from happening. There are many times when you may wish to prevent this, but not built into Windows. Here's how to get better control over Windows 10 update restarts
I quite often work late at night on coding or website design. Sometimes I'll just get to the point where I need to stop and sleep so I'll lock the workstation and get some sleep expecting to be able to unlock and carry on in the morning. Sometimes I leave a large download running overnight, I'm stuck on a < 1MB/sec connection thanks to BT still using old Victorian infrastructure, but in the morning - no download. Other times I'll leave a program running to perform a large calculation, a backup archive running, or a video encoding.
Whatever your reason for leaving a computer on overnight, Windows Updates will automatically reboot regardless of the applications you have open or the tasks being performed. In the morning Windows is all freshly rebooted and your applications, browser tabs, and unsaved work are all gone.
There is no way to disable automatic reboots in Windows 10 - Microsoft forces it upon you.
You can set active hours and Windows will schedule an update outwith these hours, but you must leave a 6-hour block free where Windows can reboot.
There are two methods to prevent Windows from automatically rebooting, both involve using the task scheduler to fool Windows into delaying update reboots.
The first is to disable the service which performs Windows Update reboots.
Please note that rebooting may be required before any newly patched vulnerability becomes effective so you need to understand this and still routinely reboot when patches are applied in a somewhat timely manner to ensure your system stays secure.
Disable Windows 10 Update Reboots by Disabling the Reboot Service
Windows runs its reboots using the Scheduled Task called \Microsoft\Windows\UpdateOrchestrator\Reboot. However, if you open Task Scheduler and disable it, Windows will happily reenable it - even if you change its permissions to make it read-only.
If a reboot is scheduled, the following command, run with administrative privileges, will disable the task:
schtasks /change /tn \Microsoft\Windows\UpdateOrchestrator\Reboot /DISABLE
Knowing this, you can create your own Scheduled Task to periodically run the above command and disable Windows' Reboot. If you're familiar with how to use Task Scheduler, set up your own task. Otherwise,
- Copy and paste the markup below into a text editor.
- Save it as an XML file.
- In Task Scheduler, click on Actions > Import Task... and select this file.
- Tweak the configuration as needed.
<?xml version="1.0" encoding="UTF-16"?>
<Task version="1.4" xmlns="http://schemas.microsoft.com/windows/2004/02/mit/task">
  <RegistrationInfo>
    <Author>http://superuser.com/users/1909/kpozin</Author>
    <URI>\SuperUser\Cancel Windows automatic reboot</URI>
  </RegistrationInfo>
  <Triggers>
    <CalendarTrigger>
      <Repetition>
        <Interval>PT10M</Interval>
        <Duration>P1D</Duration>
        <StopAtDurationEnd>false</StopAtDurationEnd>
      </Repetition>
      <StartBoundary>2016-11-16T18:30:00</StartBoundary>
      <Enabled>true</Enabled>
      <ScheduleByDay>
        <DaysInterval>1</DaysInterval>
      </ScheduleByDay>
    </CalendarTrigger>
  </Triggers>
  <Principals>
    <Principal id="Author">
      <!-- That's the SYSTEM user -->
      <UserId>S-1-5-18</UserId>
      <RunLevel>HighestAvailable</RunLevel>
    </Principal>
  </Principals>
  <Settings>
    <MultipleInstancesPolicy>IgnoreNew</MultipleInstancesPolicy>
    <DisallowStartIfOnBatteries>false</DisallowStartIfOnBatteries>
    <StopIfGoingOnBatteries>true</StopIfGoingOnBatteries>
    <AllowHardTerminate>true</AllowHardTerminate>
    <StartWhenAvailable>true</StartWhenAvailable>
    <RunOnlyIfNetworkAvailable>false</RunOnlyIfNetworkAvailable>
    <IdleSettings>
      <StopOnIdleEnd>true</StopOnIdleEnd>
      <RestartOnIdle>false</RestartOnIdle>
    </IdleSettings>
    <AllowStartOnDemand>true</AllowStartOnDemand>
    <Enabled>true</Enabled>
    <Hidden>false</Hidden>
    <RunOnlyIfIdle>false</RunOnlyIfIdle>
    <DisallowStartOnRemoteAppSession>false</DisallowStartOnRemoteAppSession>
    <UseUnifiedSchedulingEngine>false</UseUnifiedSchedulingEngine>
    <WakeToRun>false</WakeToRun>
    <ExecutionTimeLimit>PT1H</ExecutionTimeLimit>
    <Priority>7</Priority>
  </Settings>
  <Actions Context="Author">
    <Exec>
      <Command>schtasks</Command>
      <Arguments>/change /tn \Microsoft\Windows\UpdateOrchestrator\Reboot /DISABLE</Arguments>
    </Exec>
  </Actions>
</Task>
Disable Windows 10 Update Reboots by Sliding the Active Hours
Another way to prevent Windows from automatically rebooting is to fool the rebooted service by keeping the active hours moving so that it never reaches the 6-hour reboot window. This is done using a scheduled task running a batch file which will automatically update the active hours and put them forward by 12 hours each time.
Simply schedule a single Batch Script (provided below) with Task Scheduler to run twice a day:
- Once at 6:05 AM
- Once as 6:05 PM
Each execution sets the ActiveHoursStart and ActiveHoursEnd times to values making Windows think you're always active and ensuring no reboot occurs from Windows Update operations.
The batch logic and the scheduling of this process is simple to scale and adjust should you run into an issue (e.g. you run into issues with Power Saving modes such as Sleep or Hibernate.)
@ECHO ON

SET HH=%TIME: =0%
SET HH=%HH:~0,2%

IF %HH%==06 SET StartHour=06 & SET EndHour=13
IF %HH%==18 SET StartHour=12 & SET EndHour=07

CALL :ChangeActiveHours
REG IMPORT "%DynamicReg%"
EXIT

:ChangeActiveHours
SET DynamicReg=%temp%\ChangeActiveHours.reg
IF EXIST "%DynamicReg%" DEL /Q /F "%DynamicReg%"

ECHO Windows Registry Editor Version 5.00                              >>"%DynamicReg%"
ECHO.                                                                  >>"%DynamicReg%"
ECHO [HKEY_LOCAL_MACHINE\SOFTWARE\Microsoft\WindowsUpdate\UX\Settings] >>"%DynamicReg%"
ECHO "ActiveHoursEnd"=dword:000000%EndHour%                            >>"%DynamicReg%"
ECHO "ActiveHoursStart"=dword:000000%StartHour%                        >>"%DynamicReg%"
ECHO "IsActiveHoursEnabled"=dword:00000001                             >>"%DynamicReg%"
GOTO :EOF
The registry values are set in hexadecimal format. Also, note that the logic example below expects the script to be executed at a frame of 6:00:00 AM - 6:59:59 AM or 6:00:00 PM - 6:59:59 PM only. This can be adjusted easily with the IF %HH%==XX portion of the logic though; you can also use this same logic to test this functionality to confirm it works as expected to change the value.
| Dec | 0 | 1 | 2 | 3 | 4 | 5 | 6 | 7 | 8 | 9 | 10 | 11 | 12 | 13 | 14 | 15 |
| Hex | 00 | 01 | 02 | 03 | 04 | 05 | 06 | 07 | 08 | 09 | 0a | 0b | 0c | 0d | 0e | 0f |
| Dec | 16 | 17 | 18 | 19 | 20 | 21 | 22 | 23 | 24 | 25 | 26 | 27 | 28 | 29 | 30 | 31 |
| Hex | 10 | 11 | 12 | 13 | 14 | 15 | 16 | 17 | 18 | 19 | 1a | 1b | 1c | 1d | 1e | 1f |
When you are ready to allow Windows Updates to reboot the machine per its update operations, you can do so manually since neither method stops Windows Updates from being downloaded and installed. If you need to re-enable Windows Update Reboots, simply disable the scheduled task that executes it with Task Scheduler.
Configuring Custom Active Hours
To configure active hours manually on your device to prevent sudden restarts, use these steps:
- Open Settings.
- Click on Update & Security.
- Click on Windows Update.
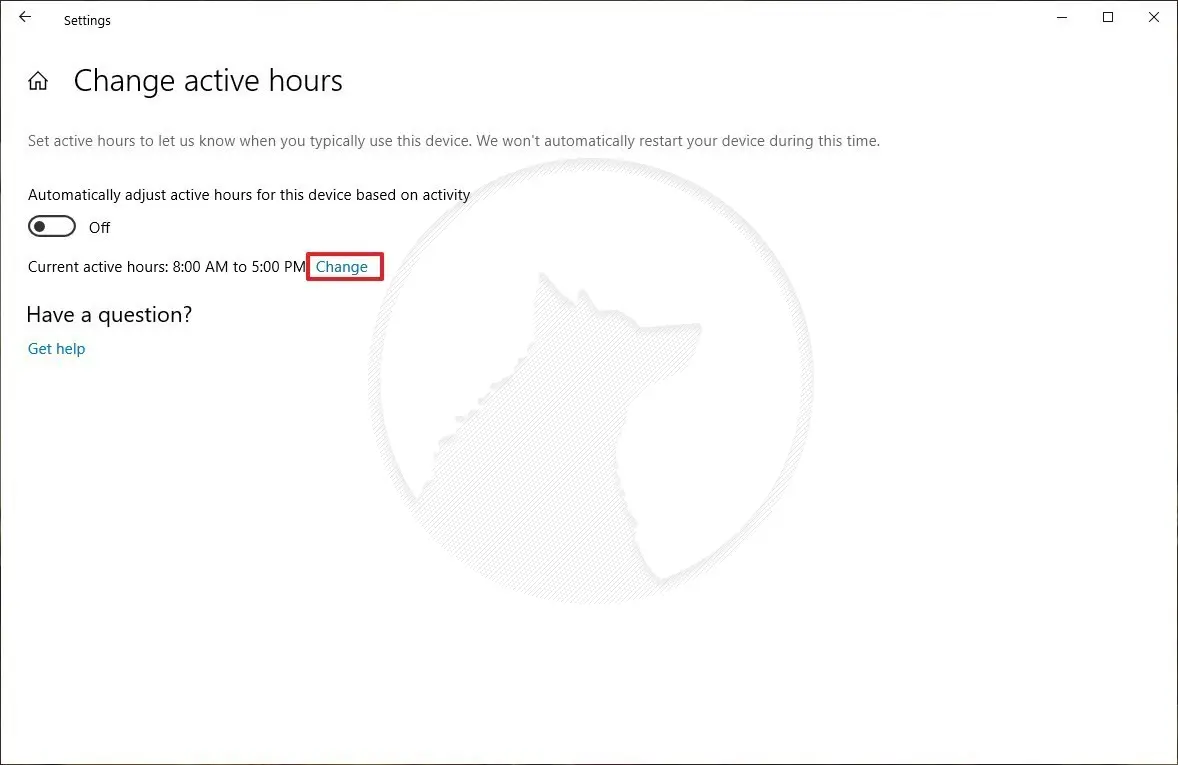
- Click the Change active hours option.

Configuring Custom Active Hours for Windows Updates - Turn off the Automatically adjust active hours for this device based on the activity toggle switch.
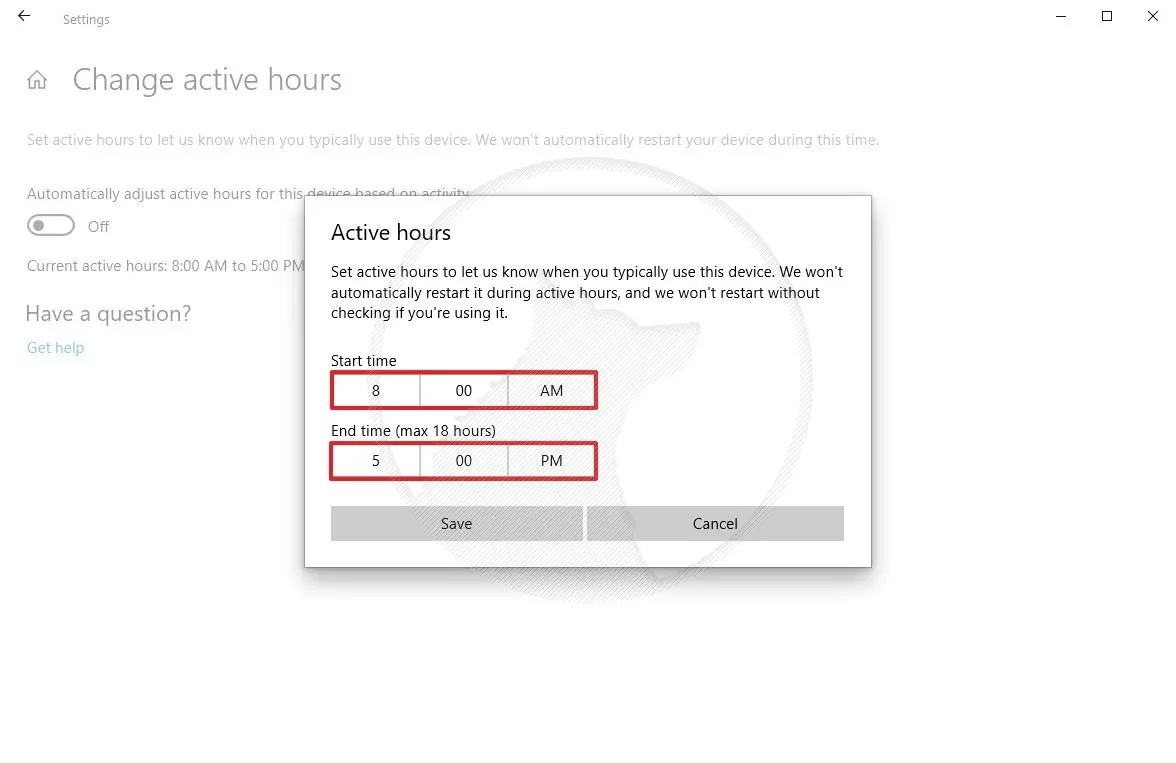
- Click the Change option.

Configuring Custom Active Hours for Windows Updates - Specify the time range you usually use your device.

Configuring Custom Active Hours for Windows Updates Quick tip: The maximum amount of time you can set is 18 hours. If you specify a range that's more than that, it'll be marked as invalid.
- Click the Save button.
After you complete the steps, if an update is pending, the computer will only restart outside the active hours you specified, preventing interruptions while you're working.
Prevent Automatic Updates from Restarting Windows XP, Vista and 7
Windows XP's automatic update facility is clearly a good thing. Except when an update is installed that requires a reboot and you're working on the computer at the time. This results in an annoying dialogue box informing you that "You must restart your computer for the updates to take effect", and "Do you want to restart your computer now?".
You get two choices: Restart Now or Restart Later. When you click on Restart Later it will nag you again ten minutes later until you restart the computer.
Automatic Updates! Stop Nagging Me!
Two methods can be used to change this behaviour, one temporary and the other permanent.
Stop the Automatic Updates Service
On the command line, type:
net stop wuauserv or from
Control Panel -> Administrative Tools -> Services
Find Windows Update Service and click on it, then click Stop.
Both methods will stop the message from appearing, but only until you restart then its back to normal.
Permanent Fix to Prevent Automatic Updates Nagging
Click on the Start Menu then Run and key in "gpedit.msc" (without quotes) and navigate to the folders to:
  Local Computer Policy
  ..Computer Configuration
  ....Administrative templates
  ......Windows Components
  ........Windows Update
There are two settings and both will work, so it's your choice. Either enable No auto-restart for scheduled Automatic Updates installations or set Re-prompt for the restart with scheduled installations to a long time interval, like 4400 minutes.
The default values are "Not configured" in case you want to return to normal.


