High ISO and Long Exposure Noise Reduction TipsEnsure maximum photo quality when taking long exposures at high ISO using various methods of noise reduction on camera and post processing.
Many cameras now offer two in-camera noise reduction choices; one for long exposures and another for high ISO settings.
During exposures of greater than ten seconds, photographs would possibly suffer from "hot pixels" which appear as bright dots and are most obvious in dark areas of the frame. With Long Exposure Noise Reduction switched on, the digital camera will automatically take a second identical exposure with the shutter closed. This clever software identifies which pixels are too bright, and makes use of that information to remove them from the original image. This is a procedure known as dark frame subtraction and can be utilized for astrophotography as well.
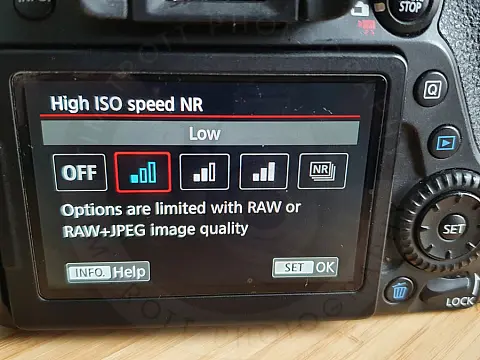
High ISO settings produce a distinct form of noise that appears as tiny coloured specs scattered all over the picture area, somewhat like film grain, giving the image a degraded look.

The High ISO Noise Reduction function will reduce this and is especially efficient at decreasing noise in shadow areas. It can also be implemented at varying strengths, however, beware that the most powerful setting may also reduce image detail.

These features are a sensible choice in the event you shoot JPEG, however, if you use RAW then noise reduction can also be carried out during or after processing, providing you with more control. If you shoot loads of high-ISO photographs, you may additionally want to consider the use of specialist noise reduction software similar to Photo Ninja or Neat Image .
Using Long Exposure Noise Reduction will rid your photographs of "hot pixels". However it also doubles the exposure time, so waiting to take the next shot is usually a pain and impractical if you need to use continuous drive or burst modes.
How to Enable Noise Reduction and Banish Noise from Your Shots
Make the most of the newest in-camera and software noise-reduction features.
Long Exposure Noise Reduction
With this in-camera feature switched on (access it using your camera's menu or Custom Functions), noise reduction is automatically carried out on exposures of one second or more. This is most beneficial for exposure times of 30 seconds or longer.
High ISO Noise Reduction
With this function enabled, noise reduction is carried out at all ISO settings for some cameras, however on others, it's only applied at higher ISO speeds. There's generally a selection of low, normal and high levels. Normal is fine for most scenarios.
Noise Reduction in Adobe Photoshop
You can also reduce image noise in Photoshop or other noise-reduction software. With the picture open in Photoshop, go to Filter > Noise > Reduce Noise. The default settings do a good job, however, you'll be able to use the sliders to adjust the strength.
Noise Reduction in Adobe Lightroom
Navigate to the Detail Panel within the Lightroom Develop Module. This is the place we're going to do all our noise reduction. At the top of the detail panel, you'll see a little preview box that is zoomed into 1:1 over an area of your photograph. There you are going to find sliders for Luminescence noise and Colour noise.

Luminescence noise is the speckles or grain that you see in your image. To reduce the Luminescence noise in your image, slowly slide the Luminescence Slider to the right. Be cautious to not move it too far, as it could make your subject start to look overly smooth.
The other form of noise that you'll frequently see in high ISO images is colour noise. This includes the little flecks of random colours which are introduced into the picture which can be a lot more prevalent in the shadow areas and darker high ISO images. Lightroom does a great job of doing away with these random colour flecks from your image.
The Detail Slider (slightly under the Colour Slider) works similarly to the way it worked within the Luminous section. The difference is that this slider starts in the middle. Slide it to the right to preserve detail and to the left to blur more of the details.
The Smoothness Slider will determine how much smoothing is going on within the image as the noise reduction is carried out. Slide it to the right to increase the smoothness in your image and to the left to remove some of the smoothness that has been applied.


